This is the final checkpoint before your study goes live. After creating your study, setting up the discussion guide, and previewing your session, this step helps Userology understand what you want to learn and who you want to learn it from. A well-defined setup leads to better participants, higher-quality responses, and smoother recruitment.
Here, You have two options: If your study details are already complete, you can publish the study directly from the Summary page and move to the Participant List. If you need to make changes, you can edit the Overview, Criteria, or Screener first, then publish the study and view your participants.
How to Start
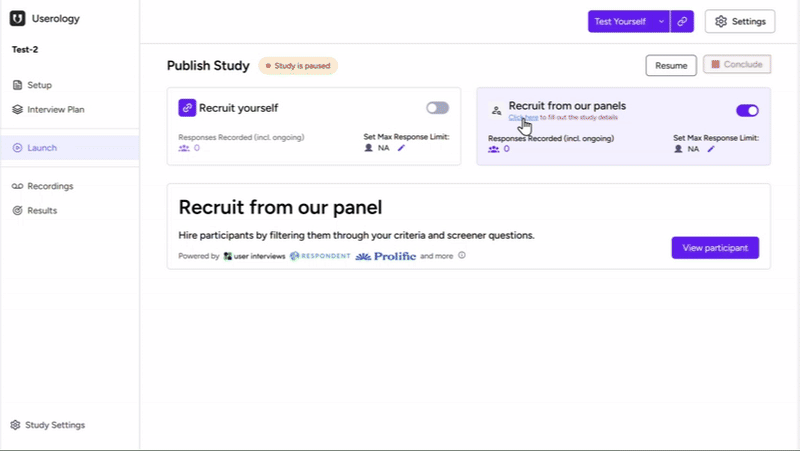
From your Study Launch Page, go to the Recruit from our panels section and click Click here to fill out the study details. This opens the Summary page, where you can quickly review your study, make edits if needed, and publish it when ready.
The Summary Page: Your Control Center
On the Summary page, you can review your Study Overview, Participant Criteria, and Screener; set the number of participants; and choose how participants are invited (Auto-Invite, AI Recruiter, or Handpick Participants). Click Publish to launch your study, or select Start with 1 Participant to begin with a single participant.
Note: You'll be notified by email when participants are recruited and when they complete the study.
Alternatively, you can edit any section by following the steps below.
Step 1: Study Overview
This step defines what study participants see before deciding to apply to your study.
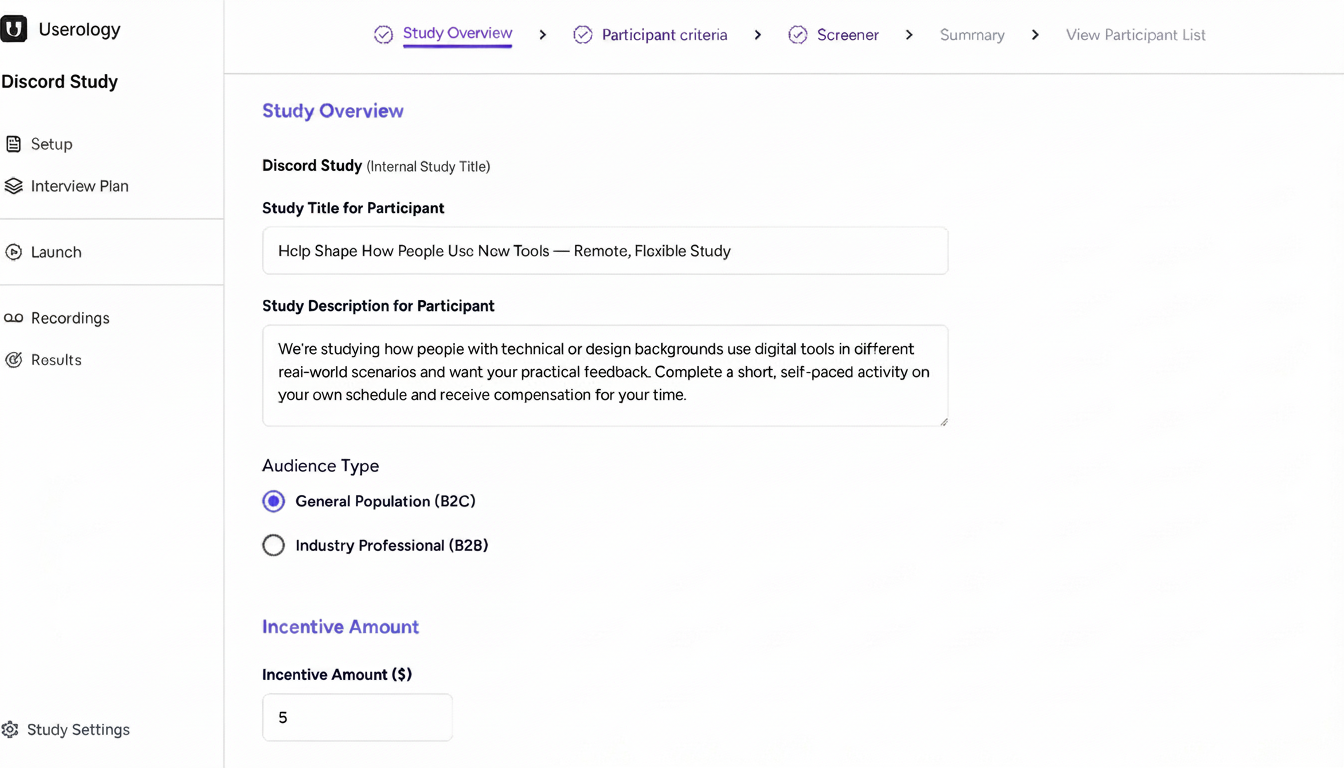
Internal Study Title
Shown at the top of the page (e.g., "Discord Study"). Only visible to you—helps you manage and identify studies internally.
Study Title for Participant
The first thing participants see when browsing studies. Keep it human and outcome-focused; avoid internal or technical labels.
Study Description for Participant
Explain what participants will do, the approximate time commitment, and that there are no right or wrong answers. This sets expectations and builds trust.
Audience Type
Choose General Population (B2C) for everyday consumers or Industry Professional (B2B) for business audiences. This determines which participant criteria are available in the next step.
Incentive Amount
Enter the reward participants will receive. Incentives directly impact recruitment speed and quality. Click Save & Continue to proceed.
Step 2: Participant Criteria
This step defines who is eligible to apply to your study.
You'll see Criteria (B2C) if you selected General Population, or Criteria (B2B) for Industry Professional.
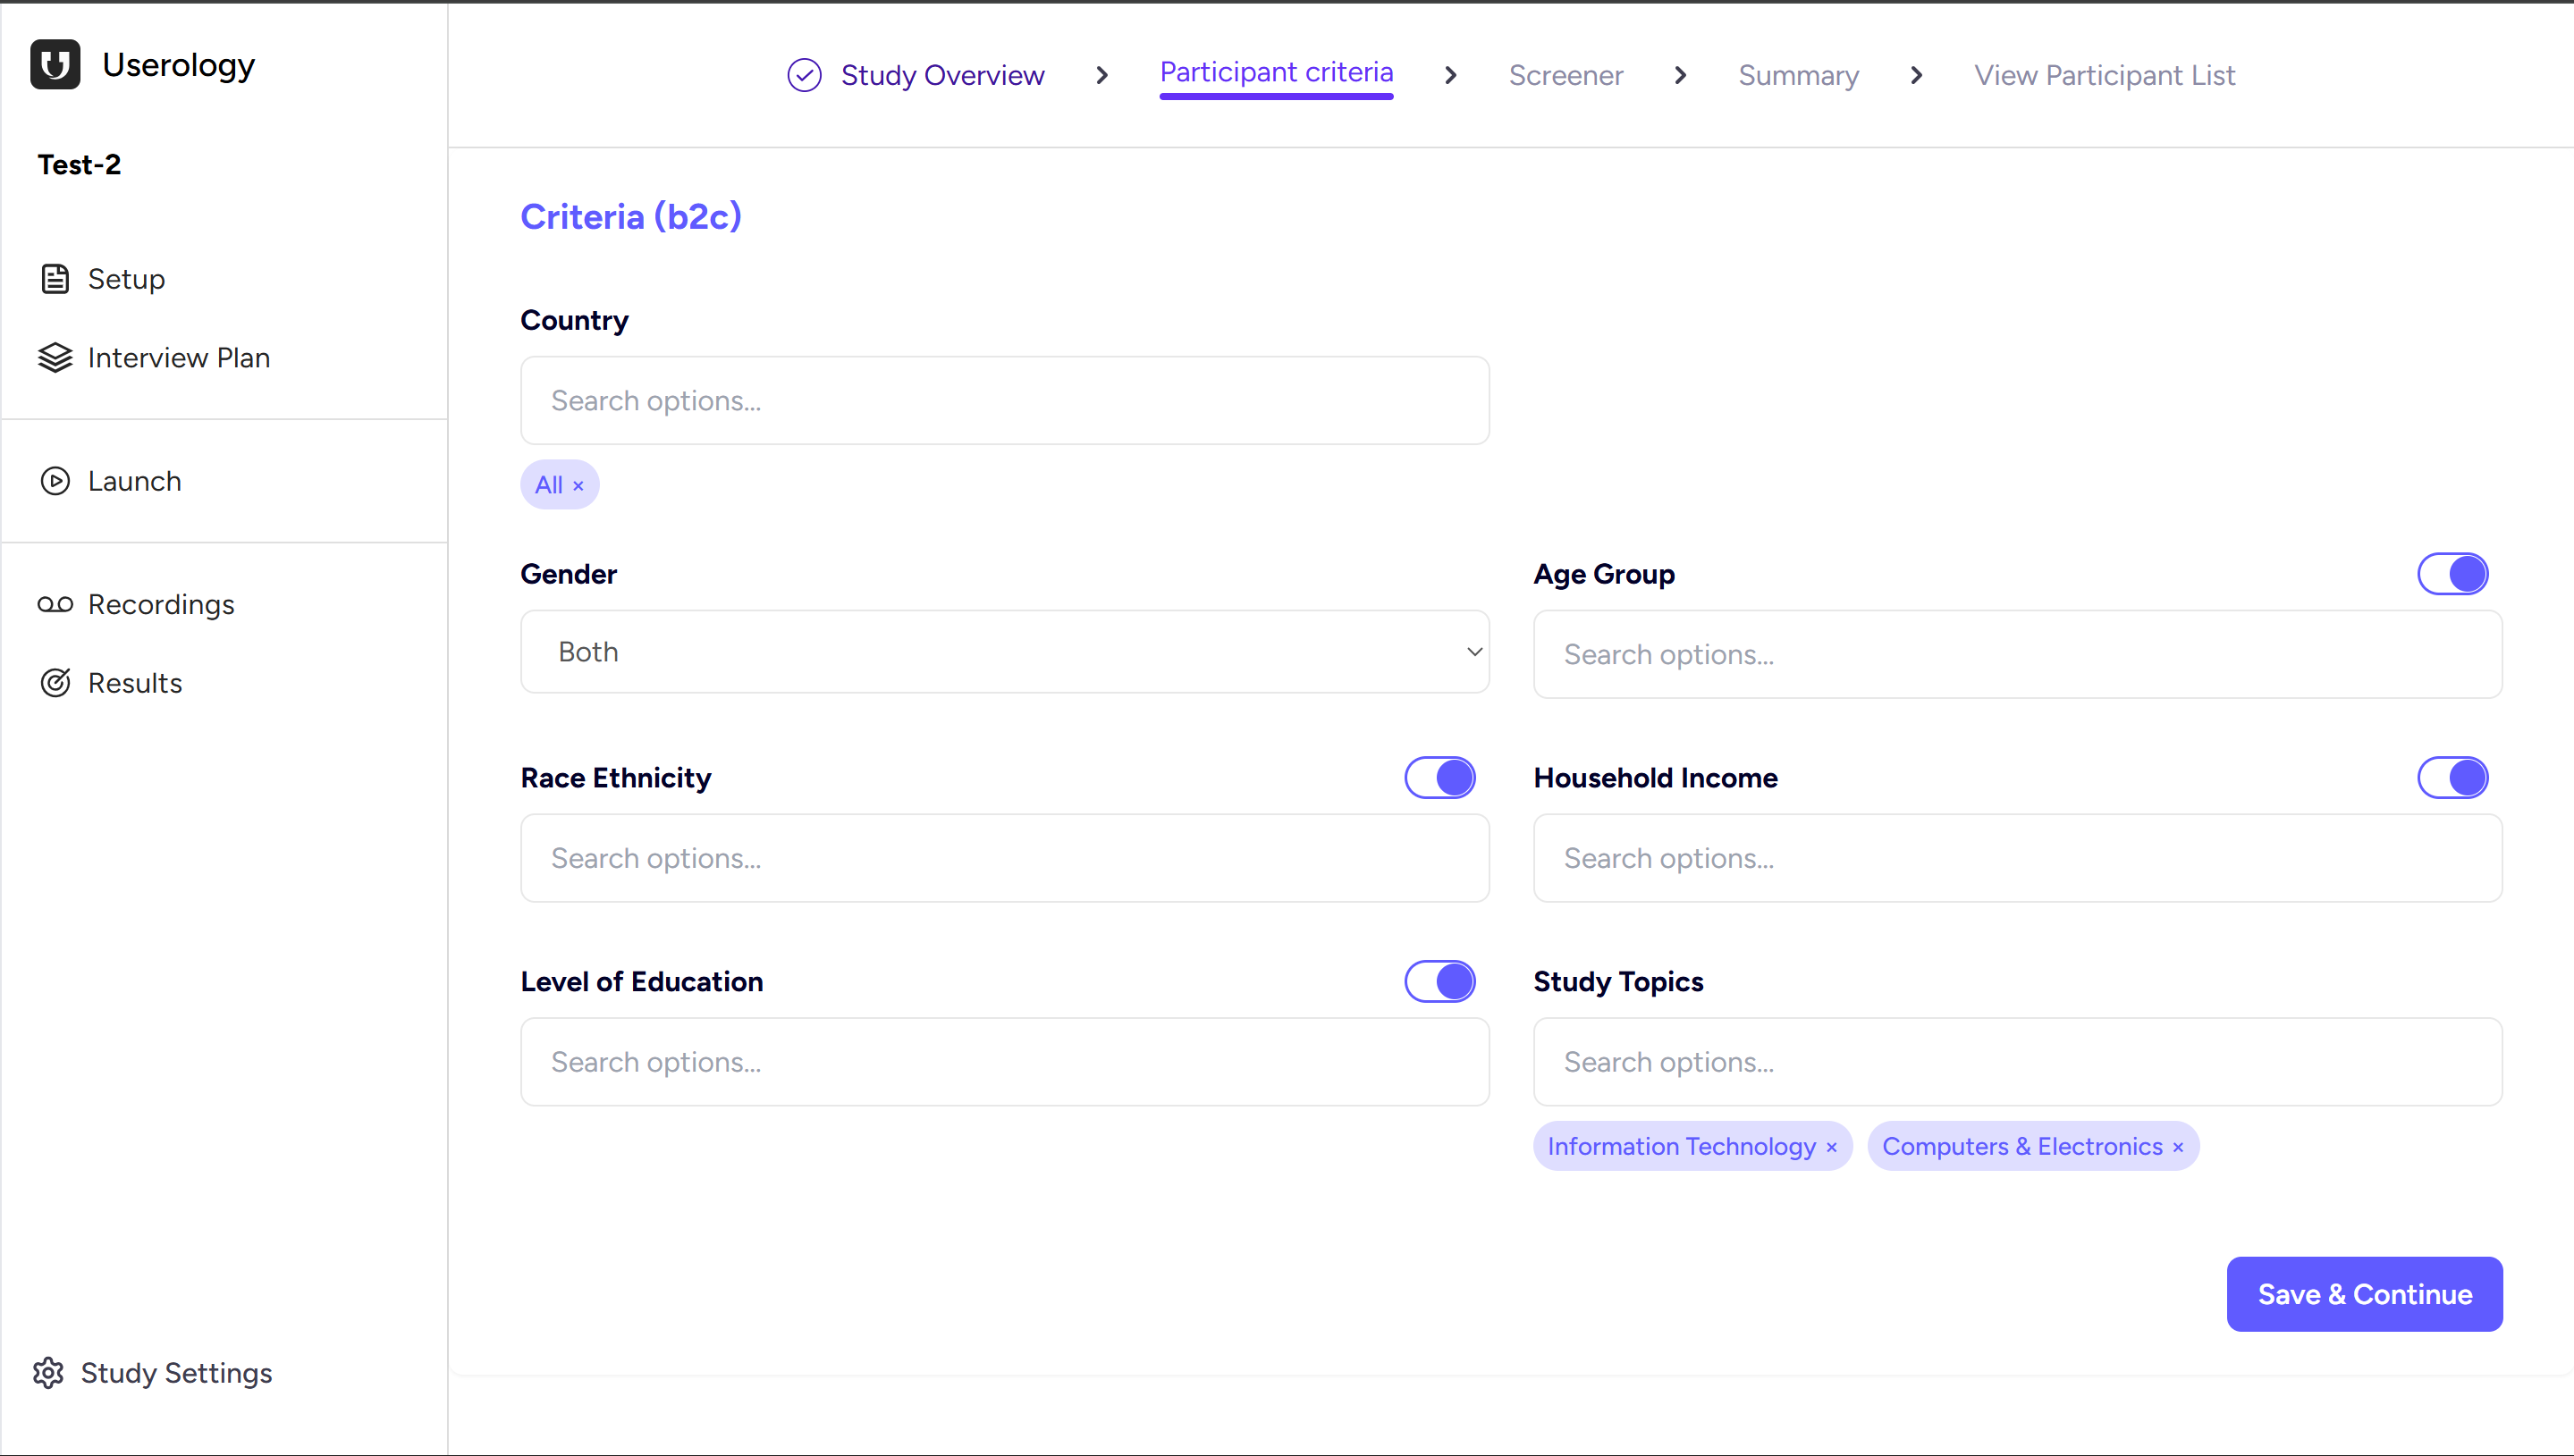
Be selective with your filters. Every filter you turn on shrinks your participant pool. Only enable criteria that are essential to your research - if a filter isn't critical, leave it off.
Available Criteria
- Country (defaults to All)
- Gender
- Age Group
- Race / Ethnicity
- Household Income
- Level of Education
- Study Topics
Click Save & Continue when ready.
Step 3: Screener Questions
Screener questions confirm that eligible participants also meet your behavioral or usage requirements. This ensures you get the right people for your research.
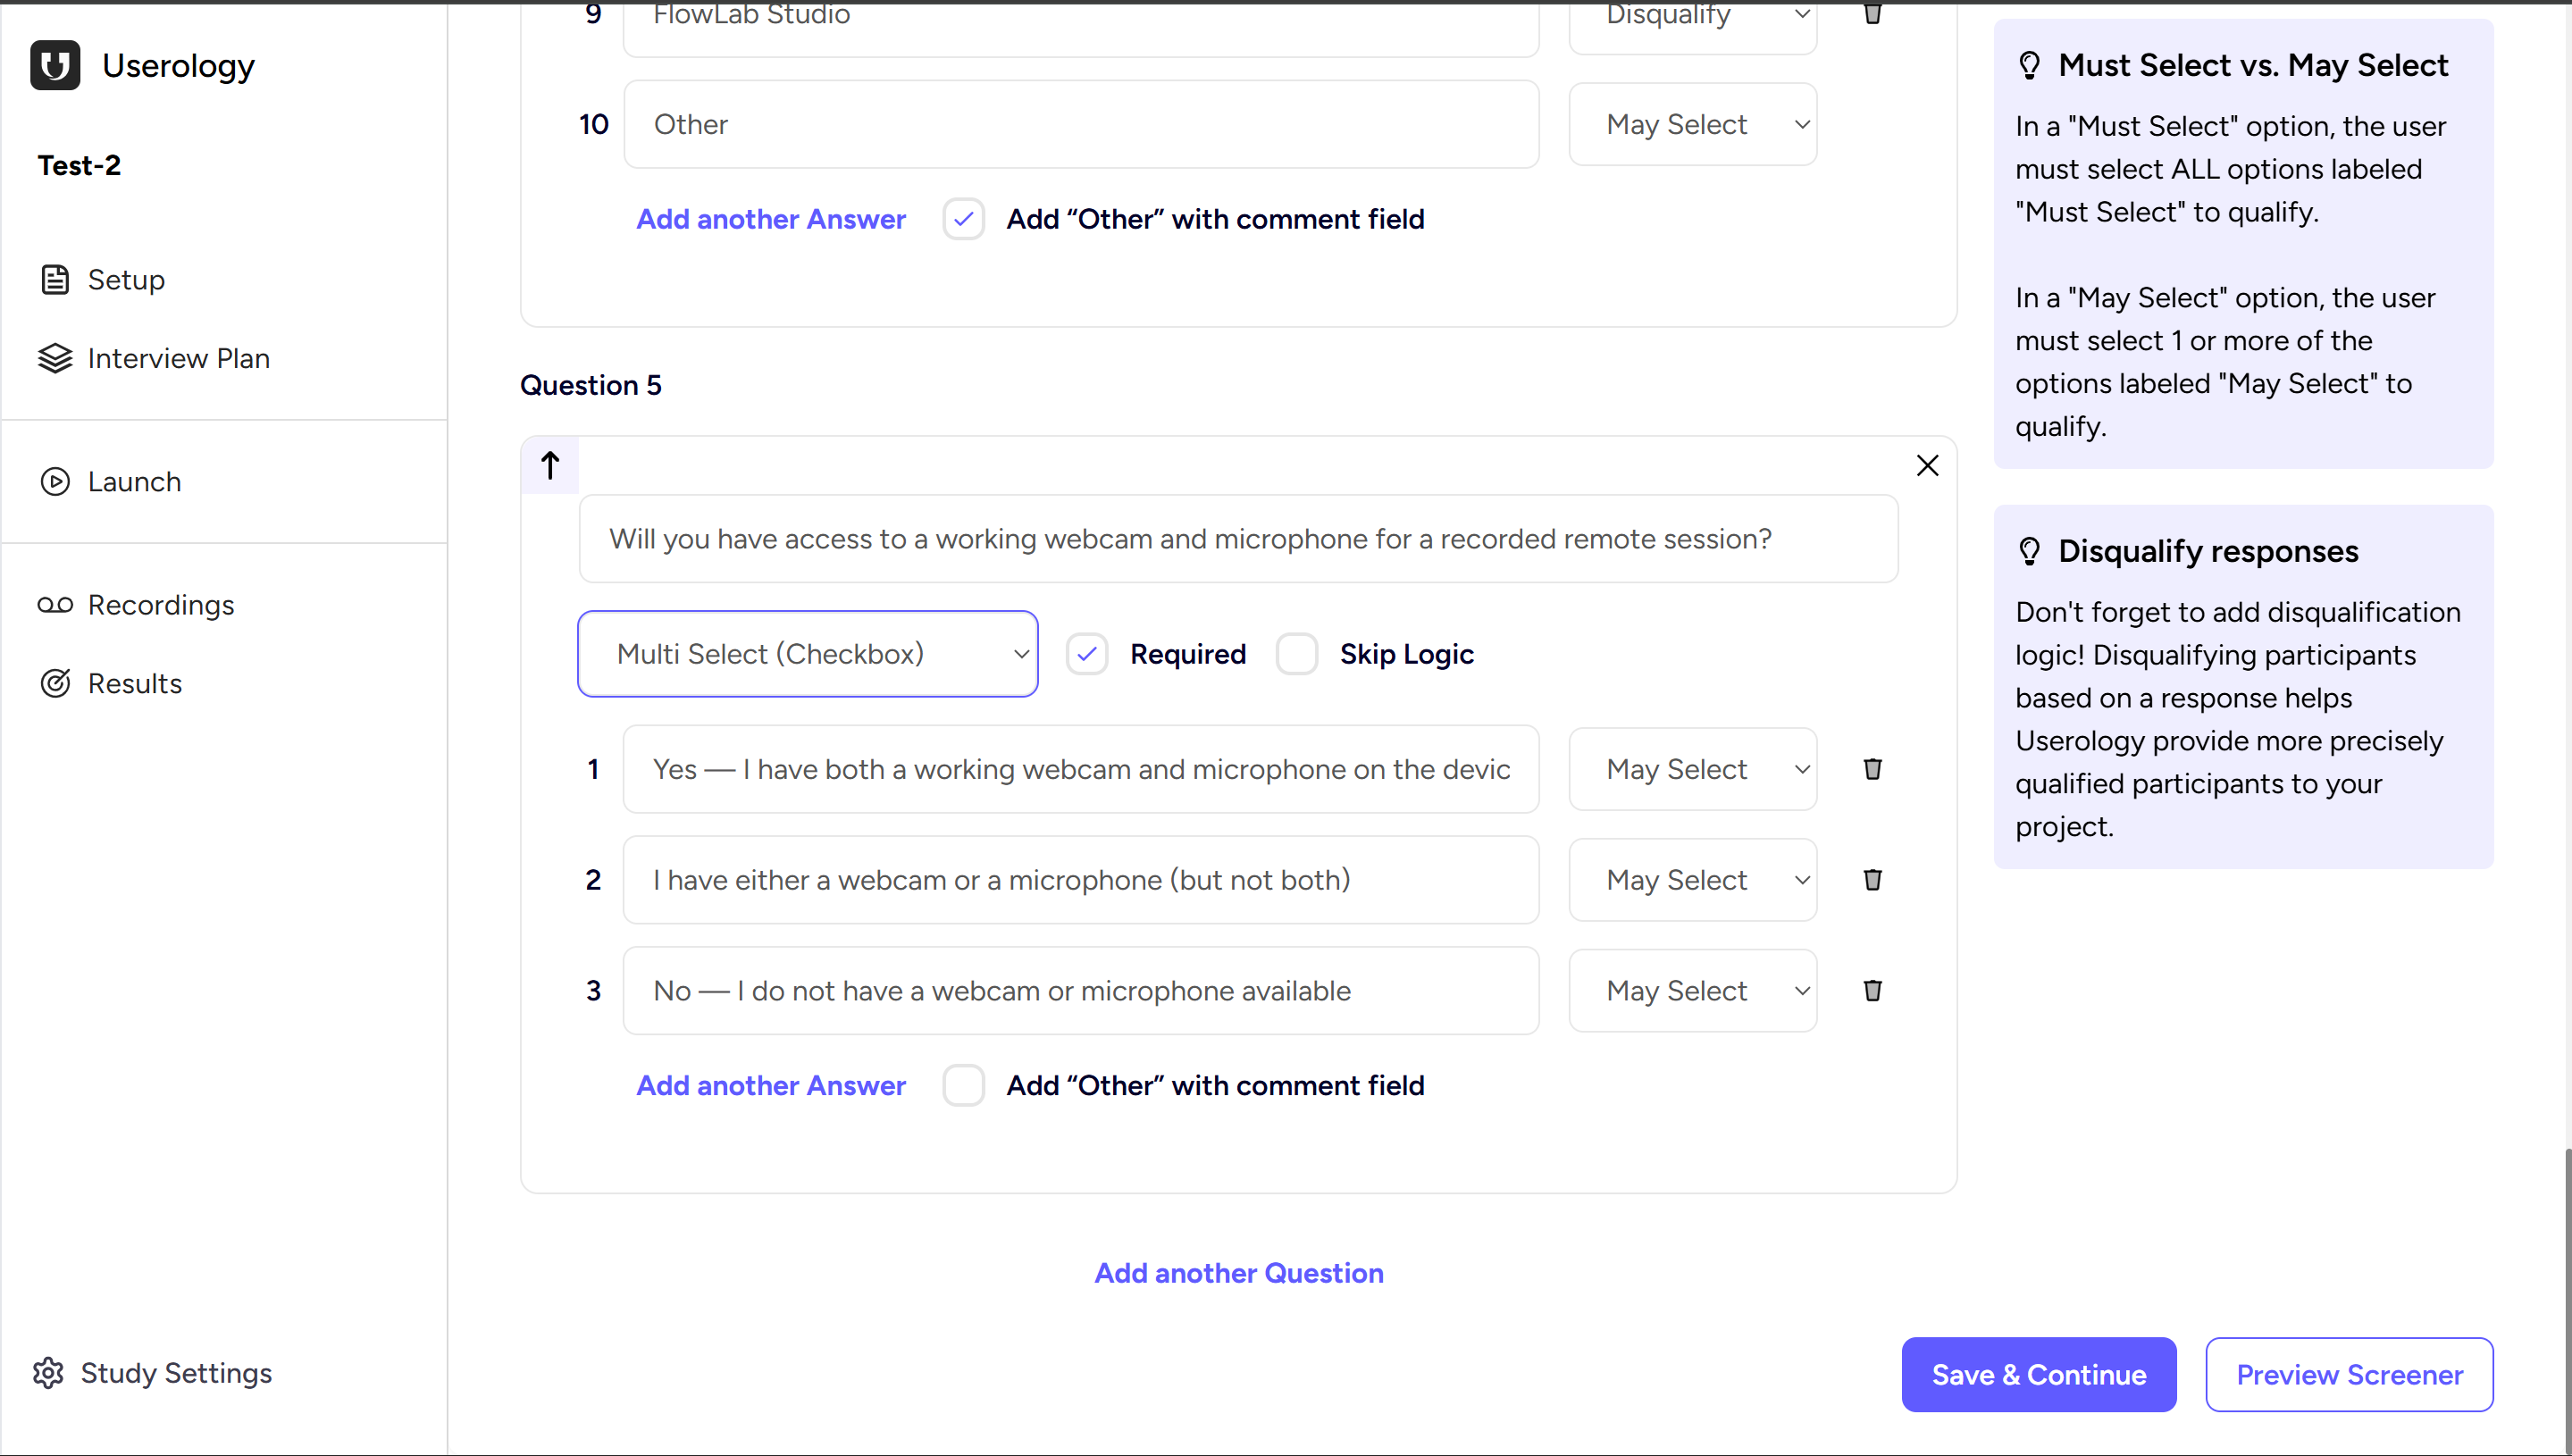
Creating a Question
Enter the question text, then choose an answer type: Single Select (Radio) for one option, or Multi Select (Checkbox) for multiple options.
Required & Skip Logic
Enable Required to ensure participants must answer before proceeding. Use Skip Logic to route participants based on their answers (advanced use).
Qualify vs Disqualify
For each answer option, set Qualify (participant can proceed) or Disqualify (participant is screened out).
Advanced Options
May Select vs Must Select (Multi-select only) — Control whether participants may select or must select specific options
Add "Other" with comment field — Allow participants to provide custom responses
Reorder questions (↑) — Arrange questions in the desired order
Delete questions (✕) — Remove unwanted questions
Manage Quotas
Use the Manage Quotas feature to control how many participants can be recruited from specific groups based on their screener answers. This ensures balanced representation across different participant segments.
Preview Your Screener
Click Preview Screener to see exactly what participants will experience. Click Save & Continue to proceed.
Step 4: Summary & Publish
This is your final review before launching the study.
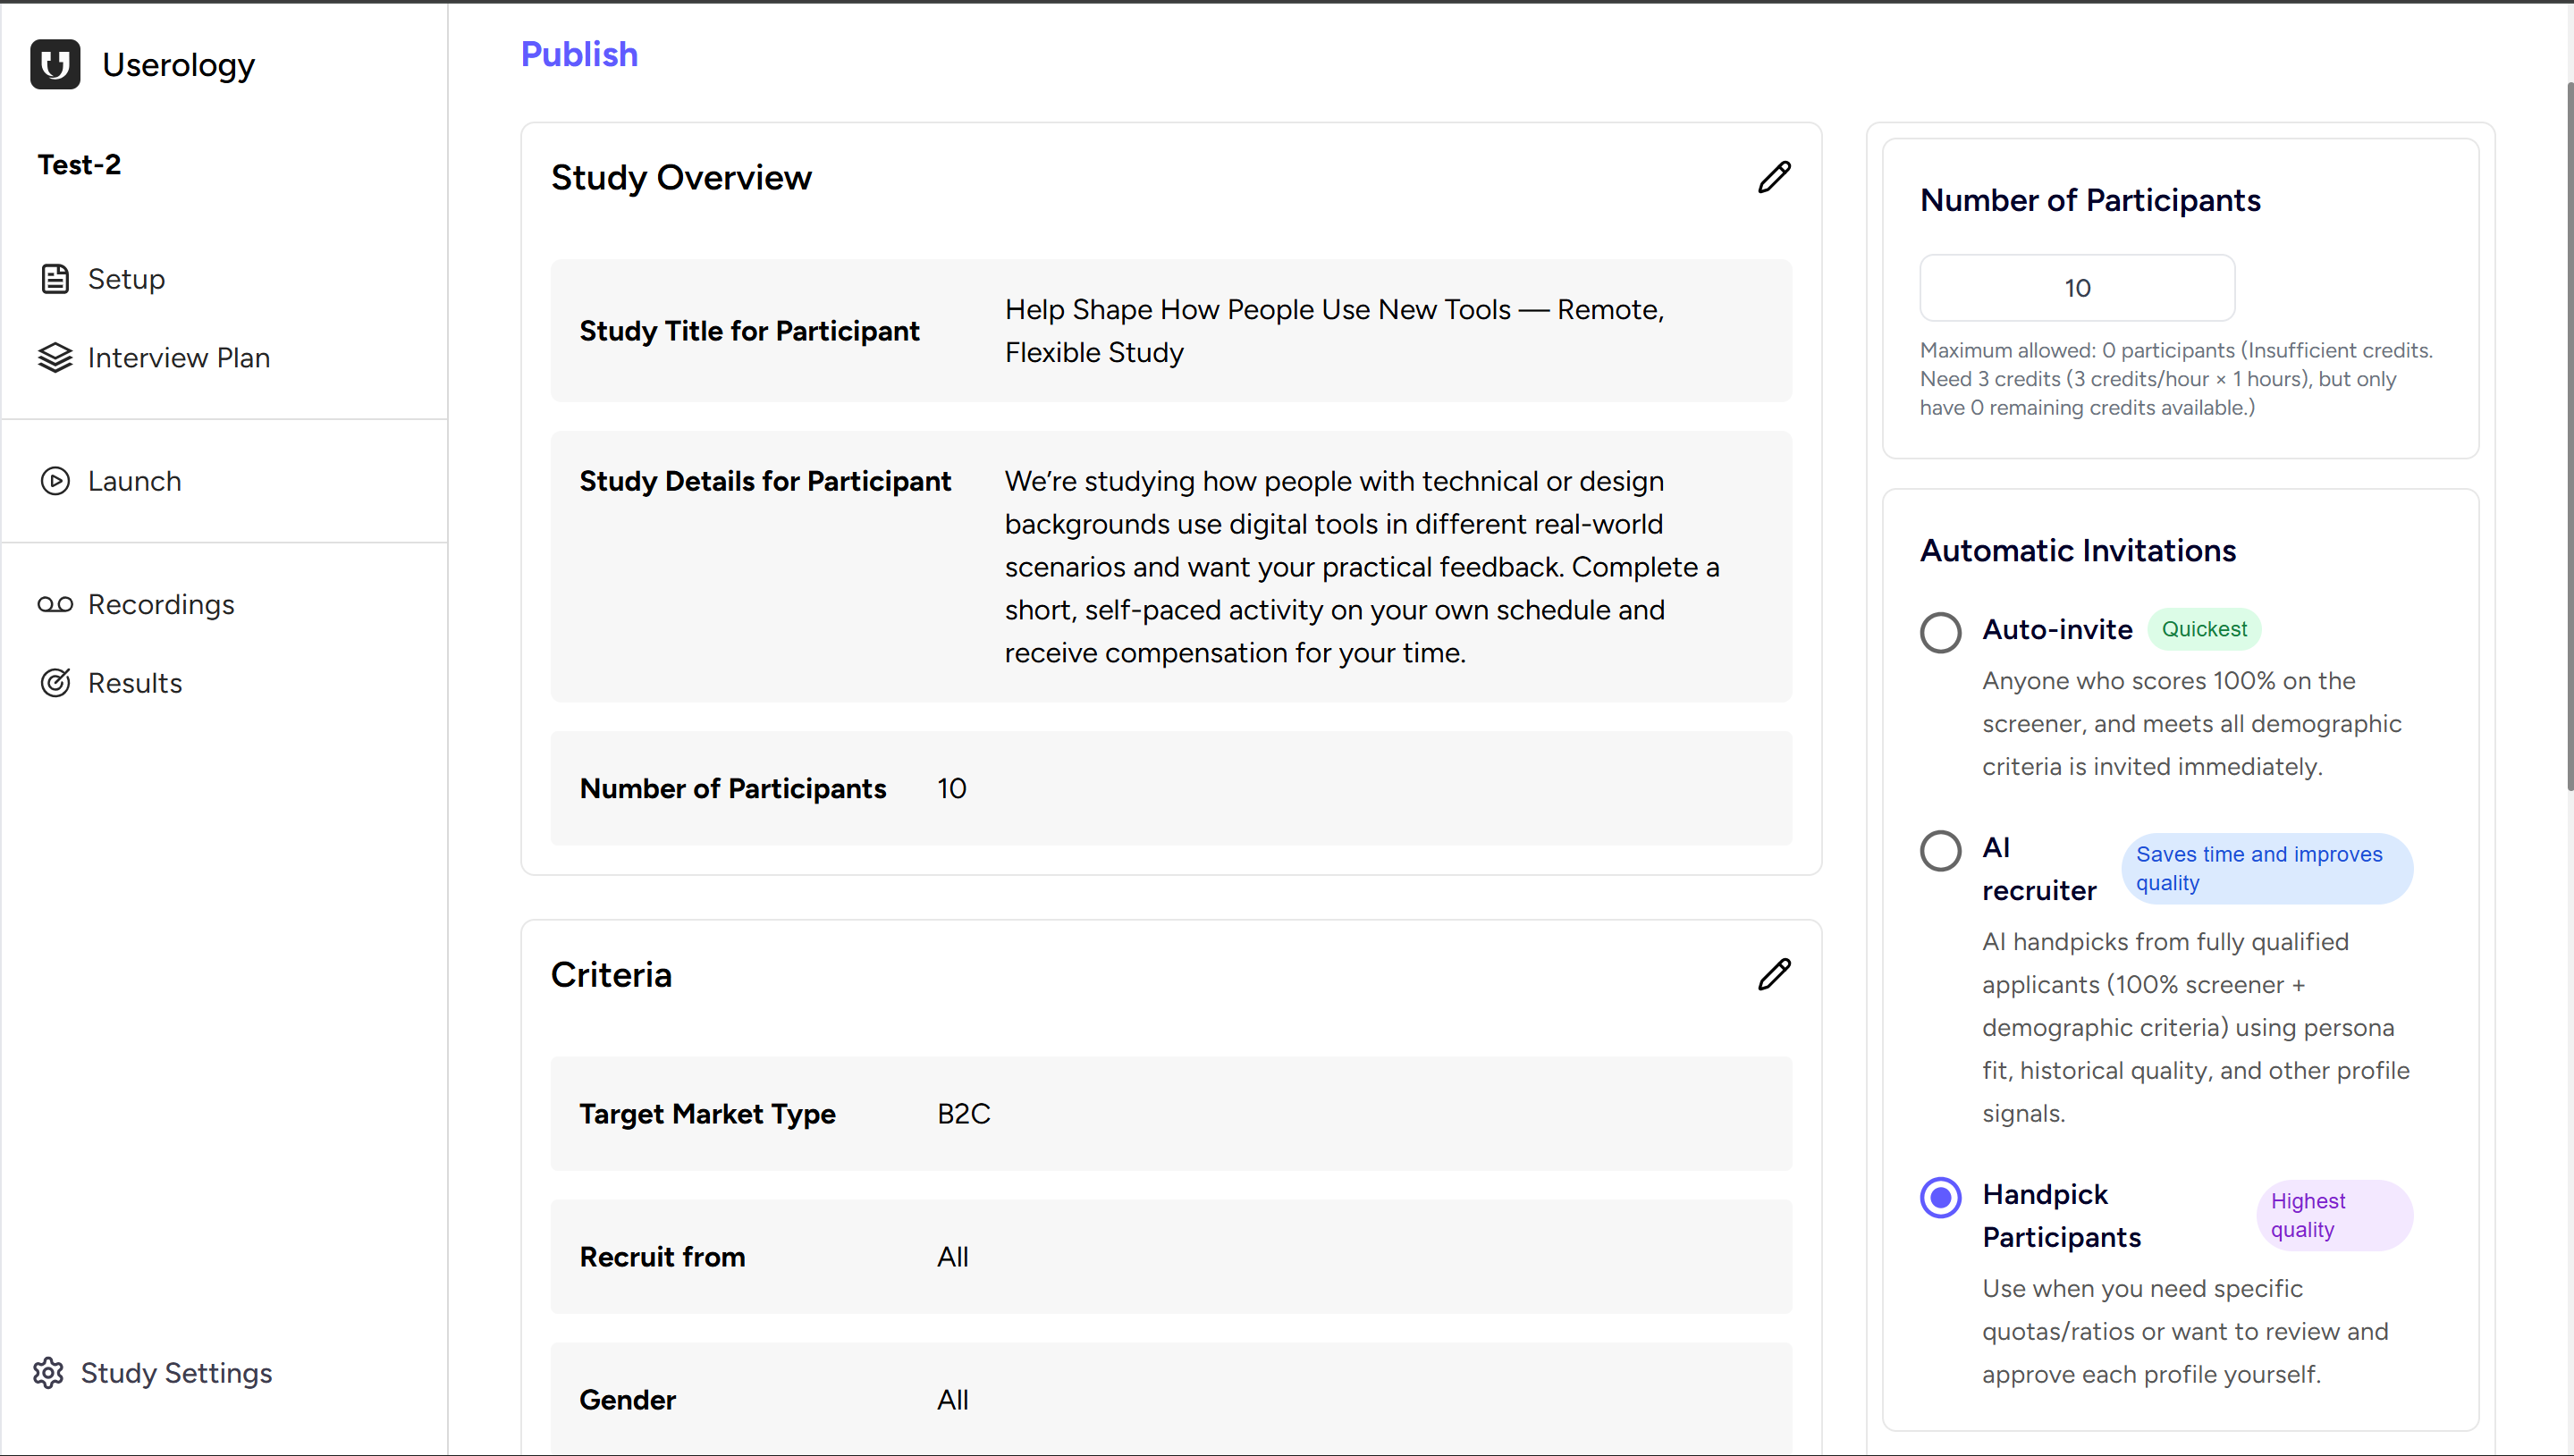
Review Sections
You'll see a summary of your Study Overview (title, description, incentive), Participant Criteria (demographic filters), and Number of Participants (target count, credit requirements, and any credit limitations). Use the ✏️ edit icons to jump back and make changes.
Choose How Participants Are Invited
Select the invitation method that best fits your needs:
Auto-Invite (Quickest) — Instantly invites participants who qualify. Best for fast recruitment when you trust the criteria.
AI Recruiter (Balanced) — AI reviews qualified applicants for quality signals. Good balance of speed and quality.
Handpick Participants (Highest quality) — Manually review and approve each participant. Best when you need specific quotas or want full control.
When ready, click Publish to launch your study. Once your first participant is recruited, you'll receive an email notification confirming recruitment has started.
Step 5: View Participant List
The View Participant List page gives you full visibility over who has applied. Here you can review screener responses, see who qualified, invite participants, manually override decisions, and report suspicious responses.
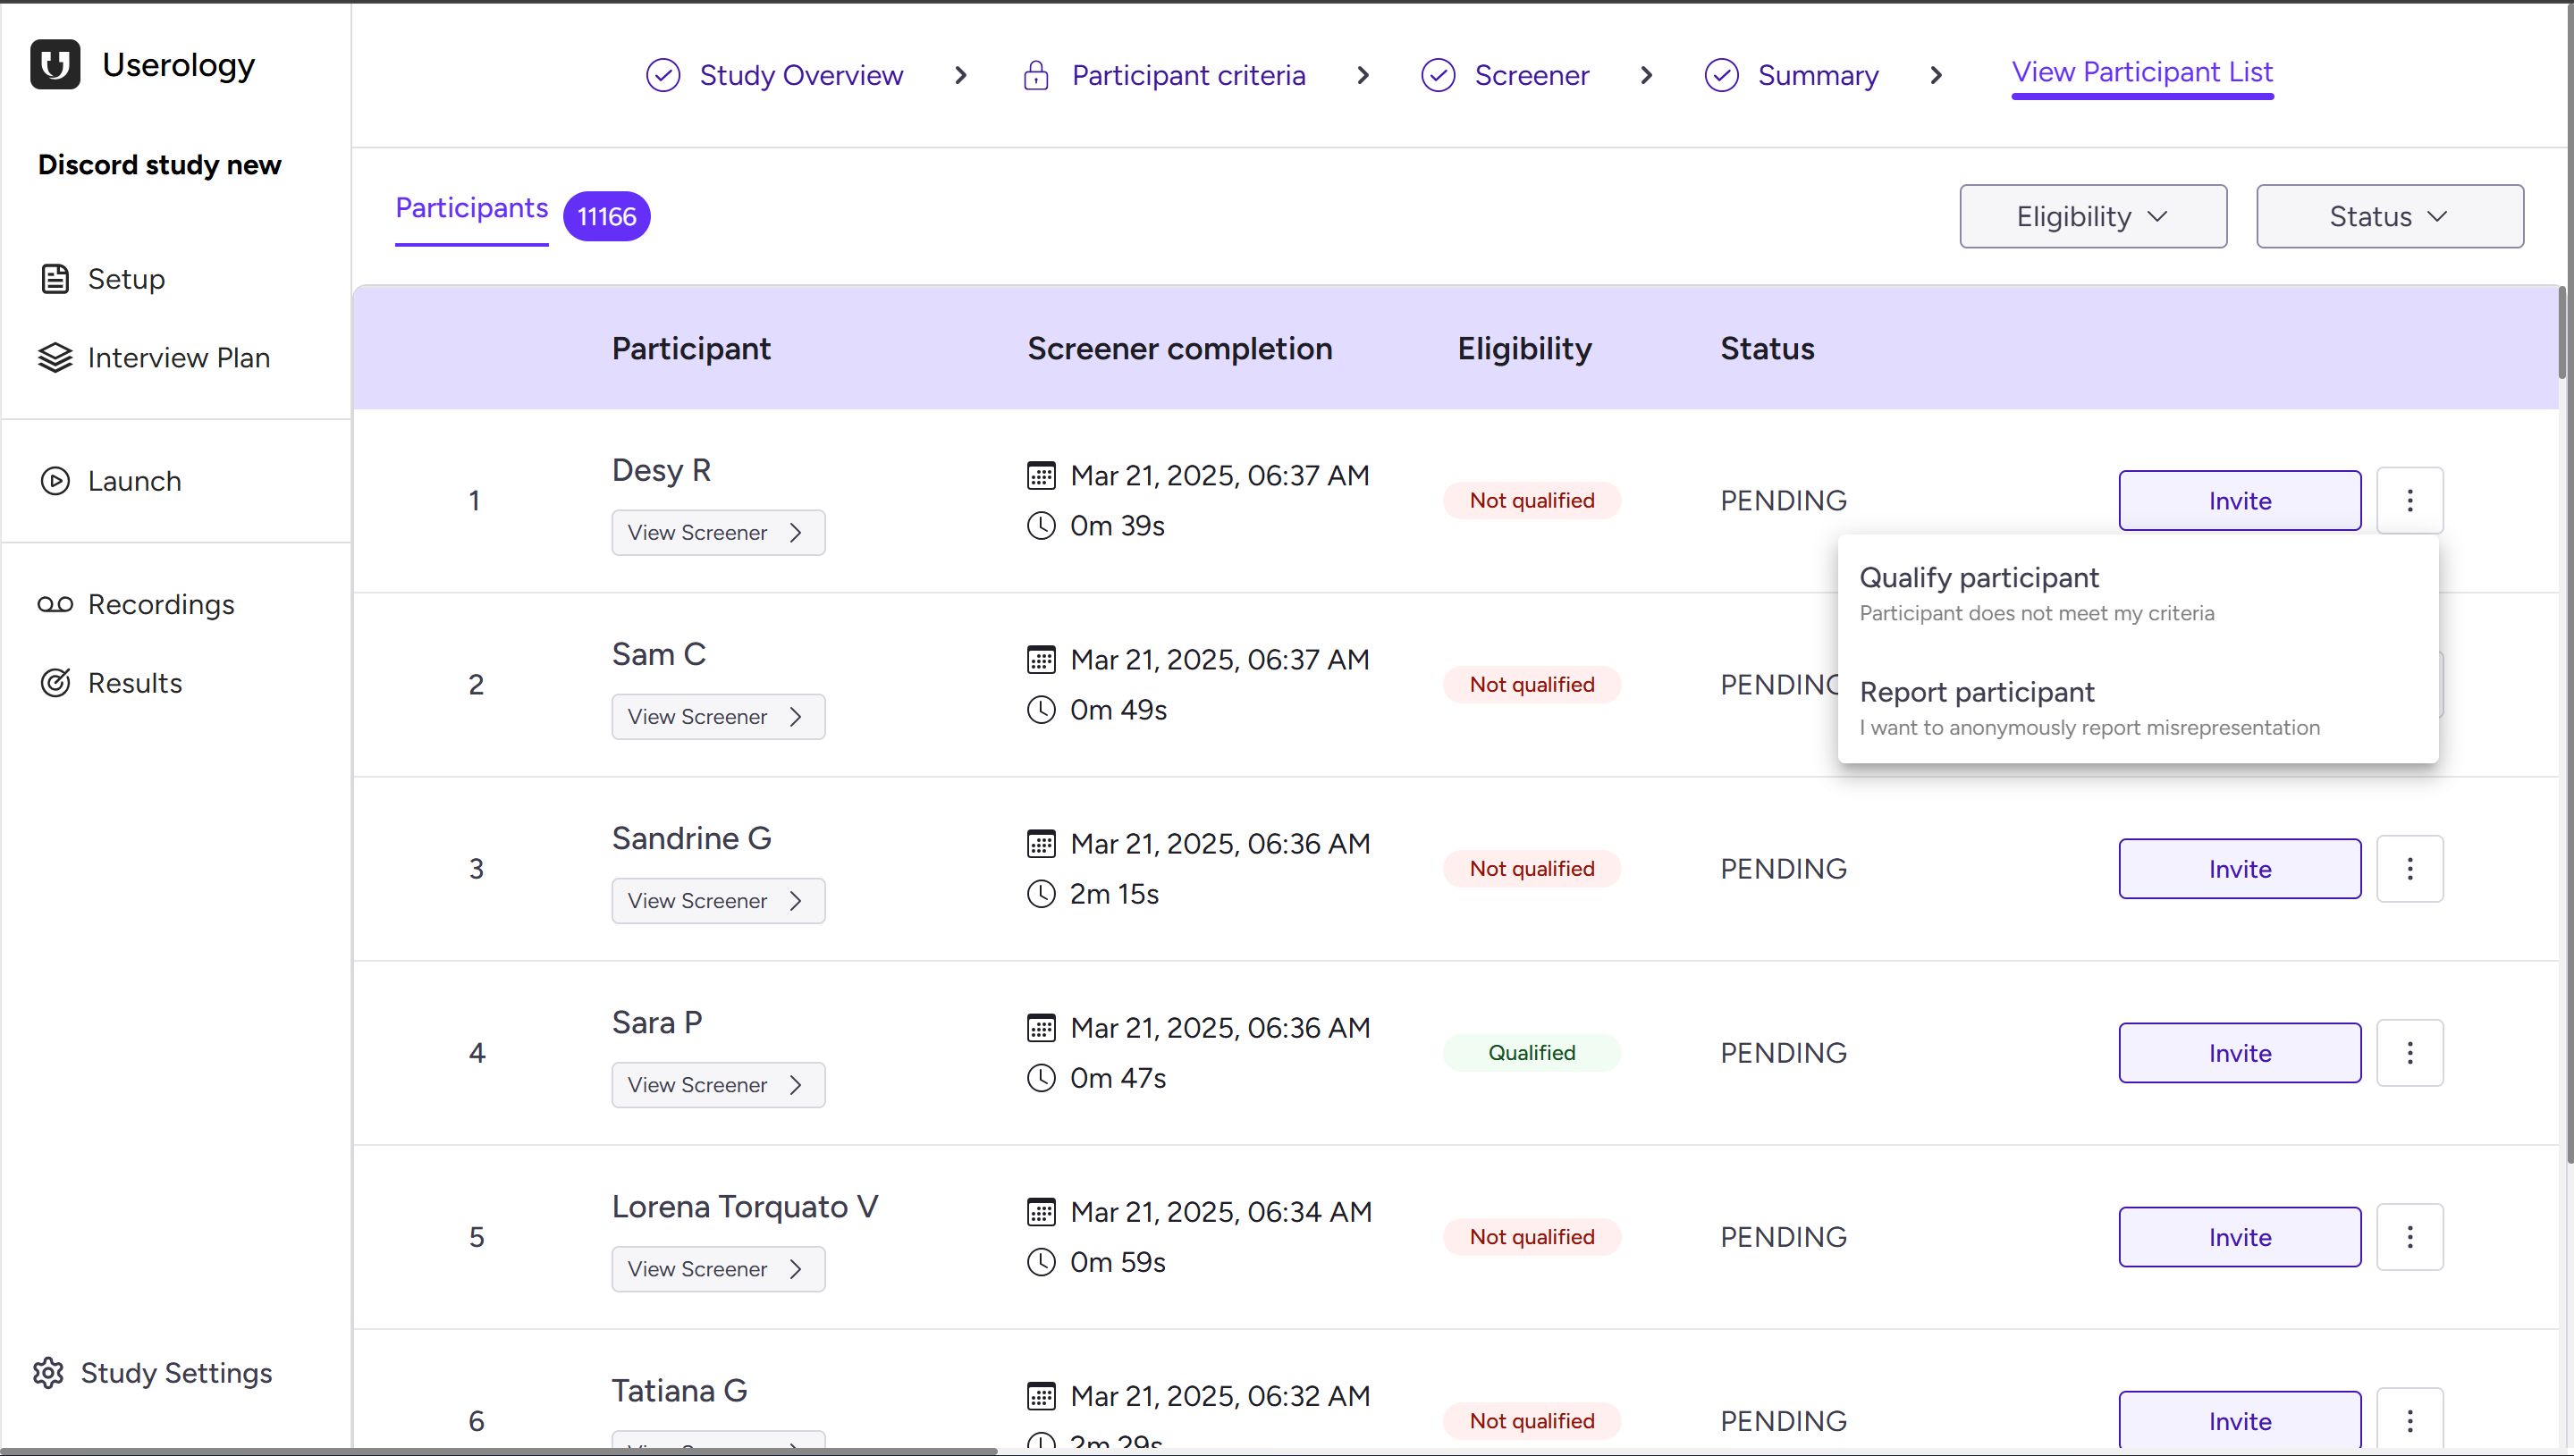
What You'll See on This Page
Each row represents one participant who completed (or attempted) your screener.
Participant Name
Displays the participant's name or identifier. Click View Screener to see their exact responses.
Screener Completion
Shows the date/time the screener was completed and time taken.
Eligibility Status
Reflects how the participant performed: Qualified (green) means they met all requirements; Not Qualified (red) means they failed one or more checks. This is calculated automatically.
Participation Status
Shows the current state: Pending means not yet invited or scheduled. Other statuses appear once invitations or sessions begin.
Actions You Can Take
Invite
Click Invite to send the study invitation. Available for qualified participants and (if needed) manually selected ones.
Tip: Even if someone is marked "Not Qualified," you retain manual control.
View Screener
Opens the participant's full screener responses—useful for validating edge cases or reviewing borderline answers.
More Actions (⋮ Menu)
Click the three-dot menu for additional options:
Qualify Participant — Manually mark as qualified (useful if they narrowly missed criteria or you want to override)
Report Participant — Report suspected misrepresentation (anonymous, helps maintain panel quality)
Filters and Sorting
Use the Eligibility filter to view only Qualified or Not Qualified participants, and the Status filter to narrow by current state (e.g., Pending). These help when working with large applicant pools.
If you need further help, please email us at support@userology.co
Was this article helpful?
Thank you for your feedback!